


DRS 2006 supports mp3, m4a (aac), wma, FLAC, wav and ogg audio files. Adding audio files to the DRS 2006 database is very easy. You basically have two options to do this:
1. You can simply drag and drop audio files from your Windows Explorer to the Database editor. This method is used if you only want to add manually selected files.
2. Use the "Update audio index" from the Database ribbon. This method is used if you want add many audio files or if you want to update a complete audio folder.
When adding audio files to the DRS 2006 radio automation software, all information of the audio file tag will be saved to the database automatically. However you can add and edit much more information for each audio file in the database like Cues, Intros, End Types or Comments. We will explain all additional information in an extra section of the manual.
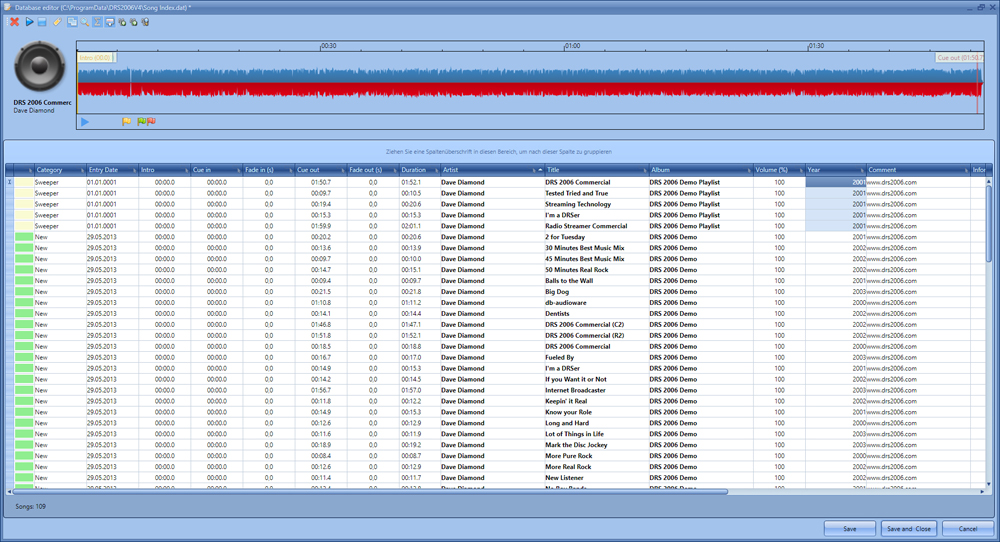
Now you can open your Windows Explorer and mark one or more audio files. Then you can drag and drop them into the grid of the Database editor. The files will automatically be placed in the Category "New".
This prodecure can also be done directly in the main DRS 2006 screen. Here you drag & drop the audio files in the upper right database section. The added files will automatically be placed in the Category "New".


Here you can set several presets before reading in new audio files. Of course you can also edit these presets later in the database editor.
Clear current index
This means that DRS 2006 will setup a complete new database. You only use this option if you really want a new database. If you choose it by accident, you can use the Backup Manager to restore your database.
Preset Cue in
If you do not want the new audio files to start from the beginning, then you can set a "Cue in" from 0 to 20 seconds. Normally this preset should be set to 0.0 seconds unless you have some special files where you need to cut off the beginning.
Preset Fade in
If you want new audio files to fade in at the "Cue in" you have set before, then you can set a "Fade in" speed from 0 to 20 seconds. Normally this preset should also remain to 0.0 seconds.
Preset Cue out (Duration - X)
This is a very interesting preset. A "Cue out" of 5 seconds for example means that the next song will start 5 seconds before the current song ends. This is normally done on all radio stations. Of course each title may have a very specific "Cue out", but 5 seconds may be a good preset for most songs.
Preset Fade out
This is also a very interesting preset. It sets the behavior of the current song when the "Cue out" is reached. If you for example set this value to 0 seconds, nothing will happen. The song will played till the end. But if you set it to 5 seconds, it will fade out when it reaches the "Cue out". The volume will go from 100% to 0% within 5 seconds.
Preset Category
This is the category all new files will be put in. Basically it makes sense to leave the Category "New" if you are reading in hundreds of new files and you already have worked on the database. This way you can filter our new files easily to put them in a proper category later on (like Pop, Rock, 80s etc). However if you for example are just reading in 1 Album and you know that it is a "Rock" album, you can of course choose the preset category "Rock". You can define as many Categories as you want in the settings. They will automatically show up in this drop down box.
Audio folder
This is
most important part. Here you set the folder you want to add to the database. This can be a single folder which only contains a few files or it can be a folder which has hundreds of subfolders and files. It can even be a share within the network (for example "\\NAS\Full Albums"). You can change this folder every time you update the index. However you can also set a default folder which will show up it each time you open the "Update audio index" window. This default audio folder is set in the "General Settings". This is useful if you have all your music in a special folder and you just want to update after copying new files to this folder.
When you are ready, you can press "Start". The database will now be updated in the background. You can see the progress on the bottom of the main screen.

For example:
F:\Audio Files\80s\Depeche Mode\Violator\XXXX.mp3
F:\Audio Files\2013\Alter Bridge\Fortess\XXXX.mp3
In the DRS 2006 you can now update the audio index by setting the folder "F:\Audio Files". All audio files in this folder and its subfolders will be inserted in the database. Lets say you have added a few more albums in the "F:\Audio Files" folder. All you have to do now is to select "Update audio index" once more with the folder "F:\Audio Files". DRS 2006 will check which files you already in the database and it will only insert the new ones. If you have left the category preset, all new files will have the category "New" and can be found very easily in the Database editor.
If you are planning to use several DRS 2006 instances on several PCs and you want to use the same database and the same audio files on all PCs, then you need to put the audio files and also the database on a share. This can be a NAS drive or a share on a file server for example. The path will then look like "\\NAS\Audio Files". You will find more information about networking with DRS 2006 in a further part of this manual.
Back to
"Get Started"